Writing image addresses to a CSV file

1 February 2022

Because an image address only has meaning within Cardbox, image addresses are not included in exports in External or CSV format.

You should have no reason to export these addresses, but if you want to do so for any reason then you can use a macro to do it. The macro takes each record one at a time, converts it to CSV format, and then adds the image address to the end of the CSV line before writing it to an output file. Here is a sample macro for you to adapt:

Option Explicit
Dim o
Set o=CreateObject("Scripting.FileSystemObject").CreateTextFile("path.to\filename\test.txt") ' Put your filename here.

StatusRange=Records.Count

Dim rec
For Each rec In Records ' Scan the whole current selection.
 WriteRecord o,rec
 StatusPosition=StatusPosition+1
 Next

Sub WriteRecord(o,rec)
Dim txt,pic
txt=rec.WriteToString(cbxWriteFormatCSV,"ID,DATE,HEADING") ' Put your field names here.
txt=Left(txt,Len(txt)-2) ' remove the end-of-line marker, which is two characters (CR/LF)
pic=Fields("PICTURE") ' Put your image field name here.
o.WriteLine txt & "," & pic
End Sub

A small change

1 January 2016

Cardbox Software Limited, the company which sold Cardbox and maintained its web site, is now closed.

Cardbox itself, the program, continues to work. It is still free to download and to use.

Read the rest of this entry »

Shutting down and starting up

29 August 2013

This is part of the series which started with Accessing Cardbox without Windows.

Your computer in the cloud isn’t costing you much. Its disk space costs you $3 per month, and actually running it costs $0.02 per hour on top of that. So leaving it running the whole time will cost you only $18 per month.

Nevertheless, this may be a lot to pay if you only ever use this facility when you are on holiday. There are two ways of cutting costs.

Stop and Start

In the Amazon EC2 Console, pick “Instances” from the list in the left-hand margin. You can stop your computer by right-clicking on it and picking “Stop” from the menu. This is the equivalent of telling a physical computer to sleep. All connections will be broken, but all data will be preserved.

A computer in the stopped state costs you $3 per month for its disk space, and that is all.

When you want to restart your computer, go to the console, right-click on the computer, and pick “Start” from the menu. Allow two or three minutes for the computer to restart.

Warning: Every time you stop and start, the IP address changes. To find out the new IP address, right-click on the computer and pick “Connect” from the menu.

Destroying your computer

You may decide that you don’t want your cloud computer any more. Or you may not want to waste $3 per month on disk space when you only use the computer for one month in the year.

To destroy your computer completely (and all the data on it), right-click on it and pick “Terminate” from the menu. Read and acknowledge Amazon’s warning messages.

All the data on your cloud computer will be lost when you terminate it. If you have only been using your cloud computer to access databases on a Cardbox Server (as we recommend), this will only mean that your workspace will disappear. But before terminating the computer, be very sure that you never created any databases on that computer, because once it is terminated they will be lost.

Using Cardbox

29 August 2013

This is part of the series which started with Accessing Cardbox without Windows.

To connect to your computer

You are ready to go. You can sign in using your Remote Desktop software as follows:

IP address: The IP address you made a note of earlier

User name: Client

Password: The password you have set up for the Client account

Domain: If you are asked for this, leave it blank

Your Remote Desktop software will connect to your new Windows computer.

(If you get a message saying “The server name on the certificate is incorrect: do you want to connect to this computer anyway?”, press the button saying “Yes” or “Connect”).

In a few seconds you will see your new Windows desktop.

To run Cardbox

On your desktop, you’ll see a Cardbox icon. Double-click on it.

Making Cardbox remember your passwords

The chances are that you’ll be using a lot of password-protected databases, and some of them may be protected with encryption keys as well. To save the boredom of having to type your credentials in the whole time, you can make Cardbox remember them for you.

  1. In Cardbox, do File > Workspace. Go to the Password tab.
  2. Turn on “Enable password protection” and enter a new password. Write it down somewhere, as a backup.
  3. Turn on “Make WIndows remember the password in future”.

Connecting to Cardbox from the Mac

29 August 2013

This is part of the series which started with Accessing Cardbox without Windows.

Microsoft have a free Remote Desktop client for the Mac. They try hard to promote it as a part of Office for Mac on this page, but if you look carefully near the bottom of the page, there is a “Search the Download Center” link which takes you to a page with a free download of Microsoft Remote Desktop Connection.

We have tried Microsoft Remote Desktop Connection for Mac 2.1.1 (the first item in the list), and it works.

Connecting to Cardbox from the iPad

29 August 2013

This is part of the series which started with Accessing Cardbox without Windows.

We have tried two apps for connecting to Windows computers via Remote Desktop. Both of them work. One is free, and the other costs money.

The free app is AccessToGo. It claims to work on the iPhone as well but we have not tested this.

The paid app is iTeleport. It costs £13.99. A first impression is that it is quite feature-rich and complex.

Setting up passwords

29 August 2013

This is part of the series which started with Accessing Cardbox without Windows.

By now, you have created your Windows computer in the cloud, started it up for the first time, and found out its IP address. You have got yourself software for connecting to Windows computers via Remote Desktop, and you have started it.

Now you have to set up passwords. This is the last bit of system administration you will have to do.

Logging in as the administrator

Here are your login details:

IP address: The IP address you made a note of earlier

User name: Administrator

Password: CBX44376A

Domain: If you are asked for this, leave it blank

Your Remote Desktop software will connect to your new Windows computer.

(If you get a message saying “The server name on the certificate is incorrect: do you want to connect to this computer anyway?”, press the button saying “Yes” or “Connect”).

In a few seconds you will see your new Windows desktop.

Changing the passwords

Press the Start button, click on “Control Panel” on the right of the box, double-click on User Accounts.

Think of a new password for the Administrator user and write it down. Then pick “Change your password” from the User Accounts window, and enter your new password.

Click on “Manage other accounts”. Delete the user called Admin (and say Yes to deleting its files). Admin is not needed.

Finally, go to the Client account and change its password. The Client account is the one you will use on a day-to-day basis when using Cardbox from your iPad or Mac. You may never need to use the Administrator account again.

And that is that. You can now log out as the administrator (press the Start button and then select Log Off from the menu at the far bottom right-hand corner). You are now ready to log in as Client, and to use Cardbox.

Optional: adding new users

Throughout this series I’ve been talking as if you are the only one to be using this computer to run Cardbox and access your Cardbox Server databases. But you may very well not be. Your work colleagues may want to do the same. In that case you will want to give each of them his own account.

To add a new user, you have to be the administrator. The same Start > Control Panel > User Accounts process you used to change passwords can also be used to add new users. Make sure you give each user a password.

There is one more thing: the users you add must be made part of the Remote Desktop Users group. The command to do this is Start-Administrative Tools-Computer Management-Local Users and Groups-Groups-Remote Desktop Users. Press the Add button, type the user names, click on “Check Names” to check them, and then press OK.
Starting the computer for the first time

29 August 2013

This is part of the series which started with Accessing Cardbox without Windows.

This page tells you what happens when you have gone through Creating Your Computer in the Cloud and finished off by pressing the Launch button to start your new computer for the first time.

What happens when you press Launch

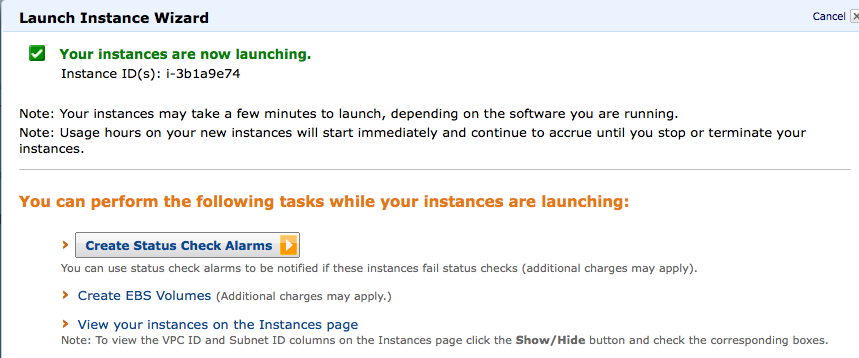
You will see the following message:

AMI launching

You can click on the “View your instances…” option.

Nothing much will appear to happen for the next ten to fifteen minutes. The instance (which is Amazon’s name for your computer) will start by looking like this:

AMI early start

After a few minutes the computer will have come into existence and the status checks will change:

AMI later launch

The computer exists but it still has to start up; Windows has to configure and authorize itself; and the computer has to reboot again after all this has been done. Allow 10-15 minutes for the whole process.

The control panel won’t directly tell you that the job has been completed (just as the lights on the front of a computer won’t tell you that Windows has finished booting up).  The best way I have found of checking when the process is complete is to right-click on the instance and select “Get system log” from the menu. When Windows is ready, the system log should look like this:

AMI system log

Getting the public IP address

You are nearly there. Windows is running, and all you need to do now is connect to it and set up the passwords. To do this, you need to know the IP address of your new computer: the public IP address, that is: the address to which people outside Amazon’s cloud can connect into it.

The simplest thing is to right-click on the instance in the list and select “Connect” from the menu. You will see a screen like this:

AMI Connect window

Make a note of the public IP address. This is the address that you will use when you connect to your cloud computer (and to Cardbox) from your iPad, your Mac, or wherever.

Now it is time to connect to your new computer as an administrator and change the passwords from the defaults we have given you. Read Connecting to the Computer from the iPad or Connecting to the Computer from the Mac, and Setting up Passwords.

Creating your computer in the cloud

29 August 2013

This is part of the series which started with Accessing Cardbox without Windows.

If you have not already done so, go to aws.amazon.com/console to sign in to the Amazon Web Services management console.

In the list of available services, click on “EC2”.

Click on this link to start creating your computer. The Request Instances Wizard will start, and will display the following information:

AMI creation details

Press the Continue button at the bottom right-hand corner of the wizard.

  • In the Instance Details page, the default settings apply: you can check that the number of instances is 1 and the instance type is ‘t1.micro’. Press Continue.
  • In the Advanced Instance Options page, the default settings apply. Press Continue.
  • In the Storage Device Configuration page, the default settings apply. Press Continue.
  • In the “Add tags” page, nothing needs to be done. Press Continue.
  • In the Key Pairs page, select “Proceed without a Key Pair” (the password for this computer is fixed, and you will change it later). Press Continue.
  • In the Security Groups page, select “Create a new Security Group”. Give it the name “Remote Desktop”, and in Inbound Rules, create a new rule by picking “RDP” from the drop-down list (it is at the very bottom of the list, so you may have to scroll). Your screen should look like the picture below. Press Continue. (Security Groups are effectively a firewall between your computer and the Internet).

AMI Security Group

  • The final page of the wizard summarises all the information you have entered or confirmed.
  • Finally, press the Launch button to start your new computer.

Now read Starting the Computer for the First Time.

Signing up to Amazon Web Services

29 August 2013

This is part of the series which started with Accessing Cardbox without Windows.

To sign up to Amazon Web Services, go to aws.amazon.com/console and press the Sign Up button at the top of the page. The screens that follow take you through the process of creating an account, entering your payment details, and entering a telephone number which Amazon will verify.

When you are asked to “Select Your AWS Support Plan”, select the free option.

Once the sign-up process is complete, select the link that says “Launch the AWS Management Console”, and press the “Sign in to the AWS Console” button on the next page.

None of this costs you anything. Costs only start when you create your server.